ActionMailbox - Lessons Learned.
ActionMailbox is a great new feature shipped with Rails 6.0 that allows you to receive emails in your website; a sort of counterpart to sending emails with ActionMailer. ActionMailbox handles the complexities of catching and storing emails and exposes a simple configuration pattern and routing DSL for processing the email messages themselves.
ActionMailbox makes good use of ActiveStorage another relatively new addition with Rails 5.2. While ActionMailbox::InboundEmail records are generated in the local database the actual emails get stored remotely and are then associated through the usual ActiveStorage::Attachment and ActiveStorage::Blob objects.
This feature came at the perfect time for us at Flagrant as we were wanting to develop a CMS (Case [not Content] Management System) as a Rails Engine. A core feature involved threaded messaging backed by email communication sent and received. We also decided to try out ActionText - the new rich text editor integration using Trix also gifted by Basecamp as part of Rails 6 - for composing the web originated messages in our CMS. We figured this would put Rails (and us) through its paces as we discovered how well these three Rails features play nicely with each other. A great practical learning exercise with lessons to share.
CMS User Flow
In our basic user flow a case gets created when some sort of request form is submitted. Usually an admin assigned to the case will want to respond to the client request with an email. Sending an email is nothing new for Rails apps but allowing the admin to format their message with ActionText including attaching images and other files is much easier now without needing to wrestle with some other third party wysiwyg editor.
However, given that we are going to want to chain this email thread we do need to plan ahead and create a way to identify our client and case. We chose to use the mail#from setting of the outgoing message which will become the mail#to when the client responds. It looks something like this:
class Admin::CaseMessageMailer < ApplicationMailer
  def message_email
    @case = params[:case]
    @message = params[:message]
    @message.body.body.attachables.each do |blob|
      attachments[blob.filename.to_s] = {
        mime_type: blob.content_type,
        content: blob.download
      }
    end
    mail(
      to: @case.client.email,
      from: "#{@case.token}@contact.example.com",
    )
  end
end
Notice we use the a generated unique token as the identifier for the outgoing email. It is also worth noting that the @message.body.body.attachables is a handy association for any files that have been attached to the ActionText message body and the #attachments DSL is perfect for including them with the outgoing message. The actual message_email template is trivial and can be as simple as:
<%= @message.body %>
letting ActionText generate the html for the email.
ActionMailbox Routing
Routing of our incoming emails happens in ApplicationMailbox:
class ApplicationMailbox < ActionMailbox::Base
  routing (/example.com/i) => :case_inbox
end
Our routing is pretty straight forward so far using just a Regexp which will trigger a match against any of the recipients. There are other ways of configuring routes using Strings, Procs and custom Objects and though there is not much official documentation it is fairly straight forward to figure out from the source code.
ActionMailbox Processing
Basically all incoming case related emails get routed for processing by:
class CaseInboxMailbox < ApplicationMailbox
  before_processing :find_case
  def process
    return unless @case
    @case.messages.create(body: body, direction: :in)
  end

  private

  def find_case
    intake_ids = Intake.where(email: mail.from.first).map(&:id)
    @case = Admin::Case.find_by(token: extract_token(mail), intake_id: intake_ids)
  end

  def extract_token(msg)
    recipients = mail.to

    # the username value of the first email address
    recipients.first.split('@').first
  end

  def attachments
    @_attachments = mail.attachments.map do |attachment|
      blob = ActiveStorage::Blob.create_after_upload!(
        io: StringIO.new(attachment.body.to_s),
        filename: attachment.filename,
        content_type: attachment.content_type,
      )
      { original: attachment, blob: blob }
    end
  end

  def body
    if mail.multipart?
      if mail.html_part
        html = mail.html_part.body.decoded
      else
        html = "<body><div>#{mail.text_part.body.decoded}</div></body>"
      end
      document = Nokogiri::HTML(html)

      attachments.each do |attachment_hash|
        attachment = attachment_hash[:original]
        blob = attachment_hash[:blob]

        if attachment.content_id.present?
          # Remove the beginning and end < >
          content_id = attachment.content_id[1...-1]
          element = document.at_css "img[src='cid:#{content_id}']"
          action_text = <<~ACTION_TEXT
            <action-text-attachment sgid=\"#{blob.attachable_sgid}\"
                                    content-type=\"#{attachment.content_type}\"
                                    filename=\"#{attachment.filename}\">
            </action-text-attachment>
          ACTION_TEXT
          if element
            element.replace(action_text)
          else
            document.at_css("body").add_child(action_text)
          end
        end
      end
      document.at_css("body").inner_html.encode('utf-8')
    else
      mail.decoded
    end
  end
end
Much credit here is due to the folks at GoRails and the source code for their episode on saving inbound emails with attachments which I adapted. The code above for finding the correct case and creating an inbound message is fairly straight forward. A bit more can be said about the attachments.
If the email is multi-part and contains attachments then every email attachment gets converted into an action-text-attachment
tag which replicates what ActionText creates when an attachment is added to a rich text message body. If there is an html body then we search with the help of Nokogiri for any inline images and replace them with a matching action_text tag; otherwise it is simply appended to the end of the message body. Note that if there is only a plain text email part it gets converted into an html body element so that it will play nicely with Nokogiri and ultimately ActionText itself.
We have come full circle allowing ActionText messages including attachments to go out as emails and processing incoming emails including attachments into ActionText messages. However, we still need to figure out how to get all this configured to work both in development and production.
ActionMailbox in Development
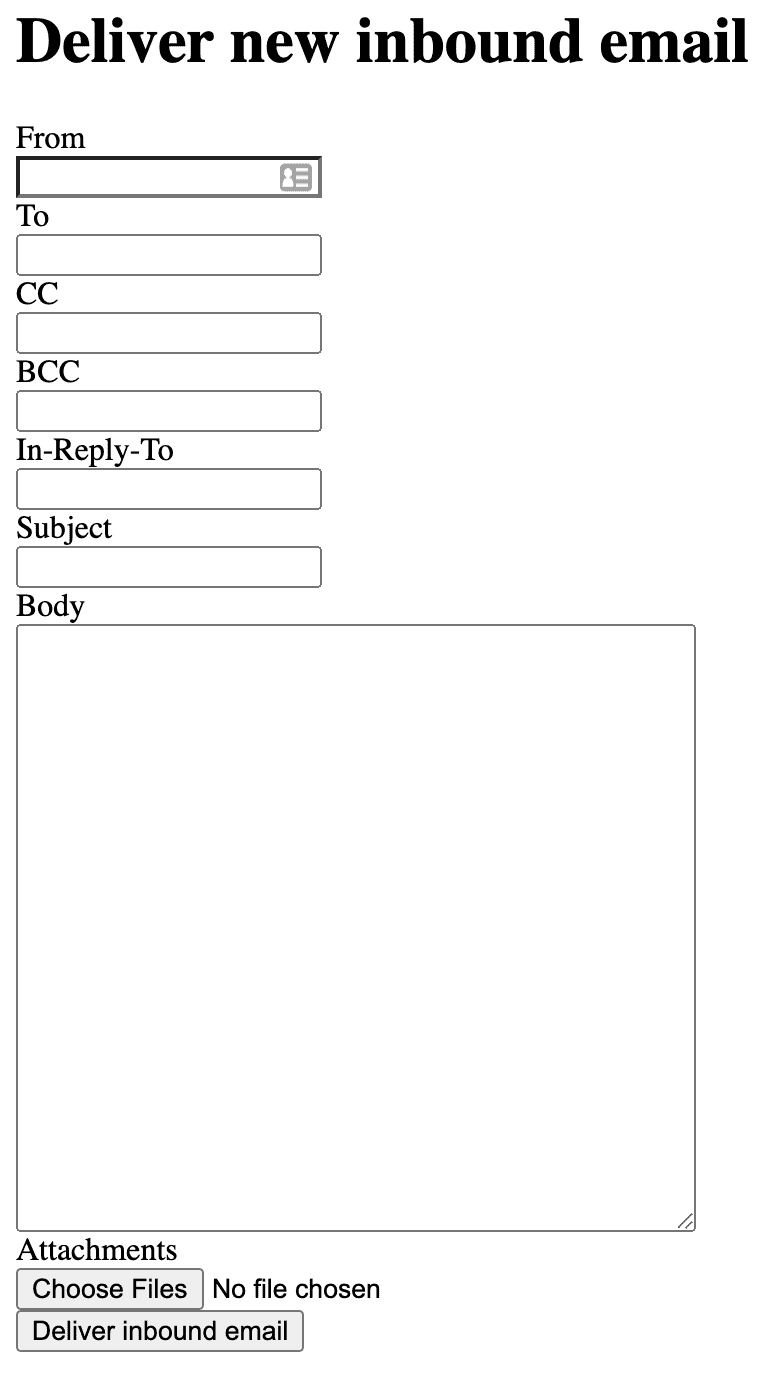
The easiest way to test receiving emails is using the conductor that ships with ActionMailbox. That page should look something like the following:

Not quite as sophisticated as what you get with an email client but sufficient for some simple local testing. Hooking up ActionMailbox in production takes a bit more effort especially when working out the details for the first time. Hopefully some of what we discovered can save you some time.
ActionMailbox in Production
As explained in the Rails Guide for ActionMailbox:
It ships with ingresses for Mailgun, Mandrill, Postmark, and SendGrid. You can also handle inbound mails directly via the built-in Exim, Postfix, and Qmail ingresses.
We were deploying to Heroku and while our first attempt was to start out with the free Sendgrid add-on we fell into a common trap of getting banned similar to something like what happened to this unfortunate person. We then tried the starter addon for Mailgun but were blocked by the limitations of the sandbox mode.
The solution was to sign up for a free Sendgrid account directly from their website. Verifying our account went much smoother without the Heroku addon interface. We were able to get all the features we needed for sending and receiving on the free plan with ease and at 100/emails per day we will probably be good for some time and will certainly be happy to pay should we ever exceed that!
Configuring our Rails app for Sendgrid was quite simple especially using secure credentials another great feature shipped with recent versions of Rails. For sending and receiving with Sendgrid add the following standard credentials in config/environments/production.rb
config.action_mailer.smtp_settings = {
  :user_name => 'apikey',
  :password => Rails.application.credentials.sendgrid[:api_key],
  :domain => 'example.com',
  :address => 'smtp.sendgrid.net',
  :port => 587,
  :authentication => :plain,
  :enable_starttls_auto => true
}
config.action_mailer.delivery_method = :smtp
config.action_mailbox.ingress = :sendgrid
Next create or retrieve a Sengrid API key . You will then need to run rails credentials:edit and add the following:
sendgrid:
  api_key: "<SendgridApiKey>"

action_mailbox:
  ingress_password: "<IngressPasswordYouGenerate>"
If you are deploying to Heroku then as long as you add your master key as a config var with heroku config:set RAILS_MASTER_KEY=<your-master-key> then your configuration will be secure and accessible from Heroku.
You will likely find it helpful to also add something like the following:
config.action_mailer.default_url_options = { host: ENV.fetch("APPLICATION_HOST") }
config.action_controller.default_url_options = { host: ENV.fetch("APPLICATION_HOST") }
that should help allow your ActionText and email images to have a proper full url without broken links. You probably already know that you must store your images on s3 or something comparable since the Heroku filesystem is ephemeral.
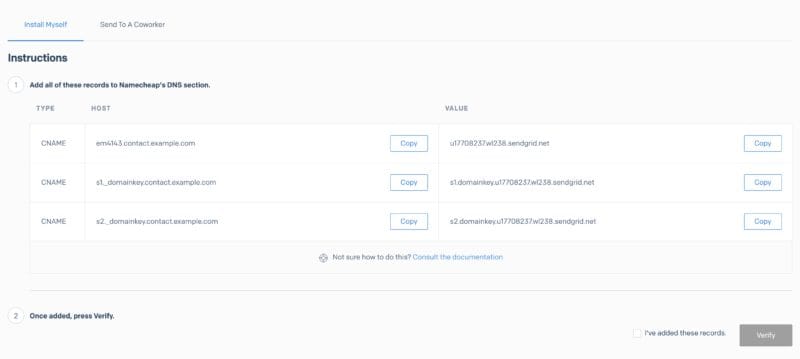
The secret sauce for both sending and receiving is to complete Sender Authentication with Sendgrid here. You need to add the em6338, s1._domainkey and s2._domainkey CNAME records to your DNS. How that is accomplished varies with your host provider.

One gotcha is that often you don’t need to add the domain for the host value (i.e. just use “em6338” and not “em6338.contact.example.com”). You will know that you got it right when you click the Verify button and it passes.
While you are in your DNS you will also want to add MX records so that email sent to your desired domain get relayed to your Sendgrid account that then forwards them to your ingress in Rails as an http request. Your record should look something like:

With that in place you can then add an Inbound Parse Sendgrid setting. The host value will be the authenticated domain and the url will be:
https://actionmailbox:<PasswordFromCredentails>@<YourWebsiteHost>/rails/action_mailbox/sendgrid/inbound_emails
ActionMailbox Conclusion
While it took a bit of trial and error to get the above all working, I am pretty impressed with how well these new features all integrate with each other and add value to what one can create with Rails. As usual, Rails supplies the basic plumbing so that you can focus more on the specific requirements of your project. Since these features are still quite new the documentation and tutorials are still a bit sparse. Hopefully this post will add to that body of information and will be improved on as experience and understanding grows by us here at Flagrant and the Rails community as a whole.
If you’re looking for a team to help you discover the right thing to build and help you build it, get in touch.
Published on October 27, 2020
